
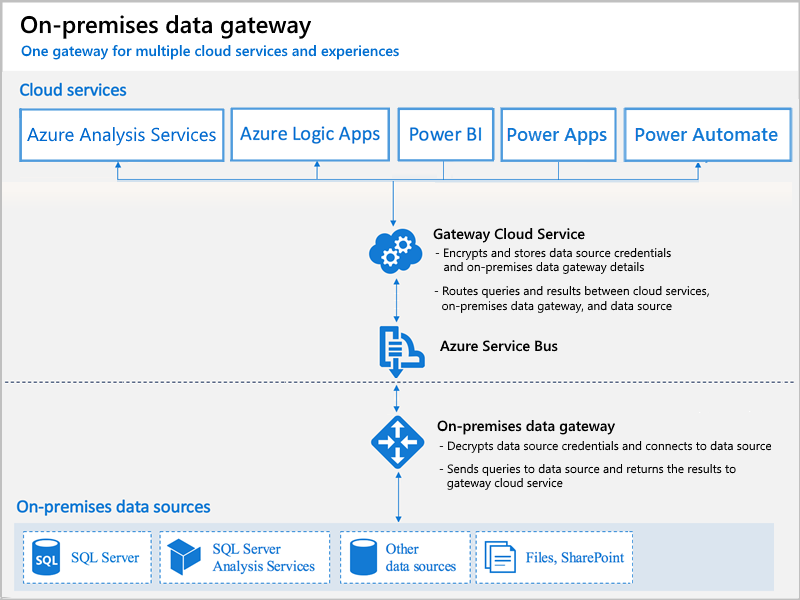
The on-premises data gateway provides quick and secure data transfer between on-premises data sources and Azure components. It acts as a bridge between onPremise and Azure Cloud. Currently, the gateway supports connections to the following data sources hosted on-premises:
- Azure Logic Apps
- Power BI
- Power Apps
- Power Automate
- Azure Analysis Services

Azure Integration: Install Azure Data Gateway
- The query created by the Cloud service with the encrypted credentials for the on-premises data source (e.g. call to custom webservice, a call to read a file from onPremise server), will be sent to a queue for the gateway to process.
- The gateway cloud service analyzes the query and pushes the request to the Azure Service Bus.
- The on-premises data gateway polls the Azure Service Bus for pending requests.
- The gateway gets the query, decrypts the credentials, and connects to the data source with those credentials.
- The gateway sends the query to the data source for execution.
- The results are sent from the data source, back to the gateway, and then to the gateway cloud service. The gateway cloud service then uses the results.
Install data gateway
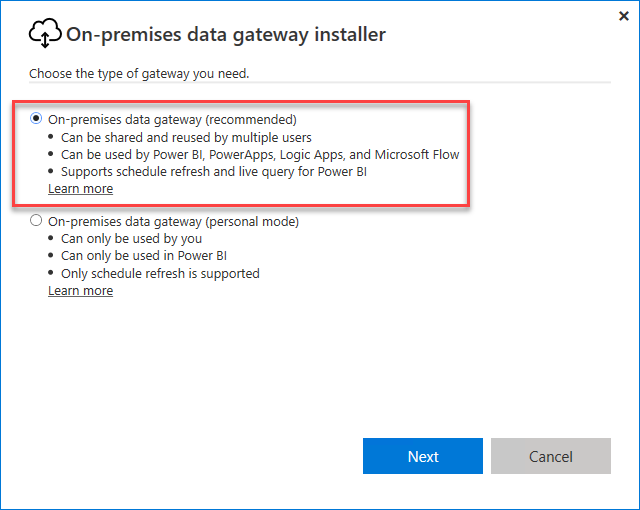
- Download and run the gateway installer on a local computer.
- After the installer opens, select Next.
- Select On-premises data gateway (recommended), which is standard mode, and then select Next.
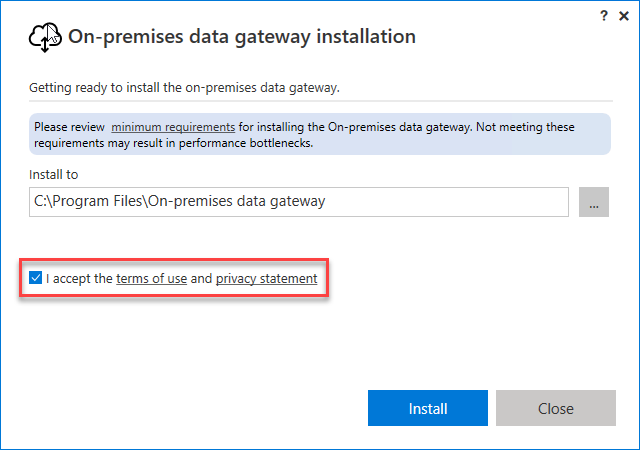
- Review the minimum requirements, keep the default installation path, accept the terms of use, and then select Install.
- After the gateway successfully installs, provide the email address for your Azure account, and then select Next, for example:

Your gateway installation can link to only one Azure account.
- Select Register a new gateway on this computer > Next. This step registers your gateway installation with the gateway cloud service.

- Provide this information for your gateway installation:
- A gateway name that’s unique across your Azure AD tenant
- The recovery key, which must have at least eight characters, that you want to use
- Confirmation for your recovery key

Important: Save and keep your recovery key in a safe place. You need this key if you ever want to change the location, move, recover, or take over a gateway installation.
Check the region for the gateway cloud service and Azure Service Bus that’s used by your gateway installation. By default, this region is the same location as the Azure AD tenant for your Azure account.
To accept the default region, select Configure. However, if the default region isn’t the one that’s closest to you, you can change the region.
More information on Data Gateway can be found here
Register on-premise gatway in Azure
- Log on to https://portal.azure.com/ with the account used for Gateway registration
- Select the correct Subscription and search for On-Premises Data Geteways

3. Click on the On-Premises Data Geteways and fill-in the required information

The name of the Onpremise gate will appear in the intsallation name. If they dont appear, then make sure correct subscription is selected(the domain used for registration), account has sufficient permission.
4. Click on create and within a moment you will be able to use the on-premise gateway in the cloud
- Driving Solution Delivery Excellence: Achieving Repeatable, High-Quality Delivery with Custom AI Agent Skills
- The Integration Gap: Why 95% of Enterprise AI Projects Fail and How Azure Integration Services Solves It
- Microsoft Copilot Studio vs Azure AI Studio: A Feature Overview
- Leveraging Azure OpenAI and Cognitive Search for Enterprise AI Applications
- Logging and Monitoring strategy for Azure Integration Components using OpenAI
- Azure Logic Apps Standard:Developer-Friendly Integration Design Rules

Hi nice rreading your post
Thank you!
Thanks for the wonderful article Poojith.I am referring the same for my article.