
Introduction
In the era of cloud transformation, API development using Microservices has become a popular integration pattern. However, securing these APIs is of paramount importance to ensure that there are no data breaches, security vulnerabilities, or financial implications. In order to protect your APIs, it is recommended to use a combination of security measures. These may include implementing network options such as VNet and IP filtering, using HTTPS for secure communication, implementing basic authentication, and using user authorization with API keys or OAuth 2.0. There are a number of ways to make APIs more secure
- Authentication & Authorization: In addition to basic authentication and API keys, you can also implement more advanced authentication and authorization mechanisms such as OAuth 2.0, OpenID Connect, and JSON Web Tokens (JWTs) to protect your APIs.
- API Gateway: An API gateway is a tool that sits between your API and its clients, acting as a front-end proxy for your API. It can help you enforce security policies, such as rate limiting, input validation, authentication, and encryption.
- Rate Limiting: Implementing rate limiting can help protect your API from being overwhelmed by too many requests from a single client or IP address, which can lead to denial of service attacks or other security threats.
- Input Validation: Input validation is a critical part of API security. It ensures that input data is properly formatted, within defined limits, and contains no malicious code. This is important to prevent attacks such as SQL injection, cross-site scripting (XSS), and other injection attacks.
- Encrypted Data: Using encryption, you can protect sensitive data in transit and at rest. This includes encrypting data sent over the network using HTTPS or TLS, as well as encrypting data stored in databases or other storage systems.
- Logging and Monitoring: Finally, it’s important to have a system in place for logging and monitoring your API for security breaches or other issues. This will help you quickly detect and respond to security incidents, as well as proactively identify potential security vulnerabilities in your API.
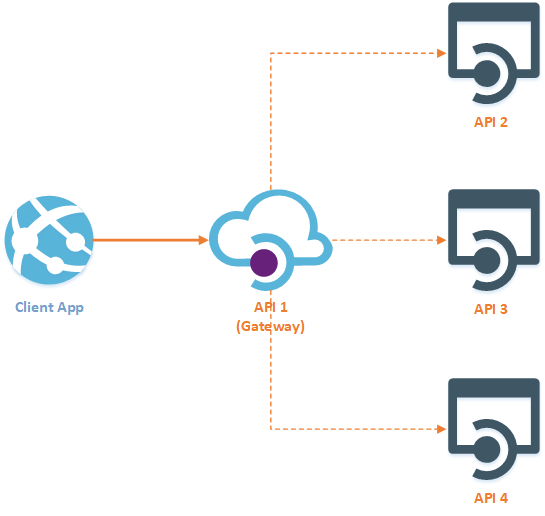
API security is a critical consideration for any modern application. One common pattern for securing APIs is to use an API gateway, which sits between the client application and the API. The gateway can apply additional security policies, such as authentication, IP filtering, and rate limiting, to ensure that only authorized requests are forwarded to the API.
Delegation is an important aspect of this pattern, and OAuth is a popular protocol for achieving it. With OAuth, a client application can ask a resource owner (typically a user) for permission to access a protected resource, such as an HTTP API, on their behalf. This delegation allows the client application to access resources without requiring the user to disclose their credentials directly to the application.
By leveraging OAuth and an API gateway, application developers can ensure that their APIs are secured and accessible only to authorized parties. Additionally, the use of delegation allows users to control which applications have access to their resources, improving overall security and user trust in the application.
Suppose you have an API that enables users to store documents. Based on the data confidentiality, the document must be saved in different locations, such as SAP open Text, Blob Storage, and SharePoint Online. To accomplish this, the API needs to interact with other protected resources. This process should be performed seamlessly on the user’s behalf, without requiring their involvement.
The question then arises: how can we keep the request acting on the user’s behalf? How can we ensure the security of the process without requiring the user to participate again?
To address these concerns, there are a few options. One potential approach is to use OAuth 2.0, a standard protocol for authorization. OAuth 2.0 enables secure access to protected resources without requiring the user to share their credentials with the API. Instead, the user is redirected to the authorization server, where they grant permission for the API to access the necessary resources. The API is then issued an access token, which it can use to communicate with the protected resources on the user’s behalf.
To achieve this, you can create a system that uses authentication and authorization mechanisms to interact with the protected resources on behalf of the user. Here’s a high-level overview of how you can accomplish this:
- Set up authentication for the API: The first step is to secure the API with authentication mechanisms such as OAuth or OpenID Connect. This will allow the user to securely authenticate themselves with the API.
- Set up authentication for the protected resources: Next, you need to set up authentication for the protected resources such as SAP open Text, Blob Storage, and SharePoint Online. This will typically involve creating an app or service account with the resource provider and configuring access to the resource using OAuth or other authentication mechanisms.
- Authorize the API to access the protected resources: Once the authentication is set up, you need to authorize the API to access the protected resources. This involves granting the API permissions to perform operations on behalf of the user, such as reading and writing documents.
- Save the document to the appropriate location: Once the API is authenticated and authorized, it can seamlessly save the document to the appropriate location based on the data confidentiality. For example, if the document is highly confidential, it can be saved to SAP open Text, while less confidential documents can be saved to Blob Storage or SharePoint Online.
- Return a response to the user: Finally, the API can return a response to the user indicating that the document has been saved successfully. This can be done using HTTP response codes or other mechanisms to indicate success or failure.
Overall, the key to making this process seamless for the user is to ensure that the authentication and authorization mechanisms are set up correctly, so that the API can access the protected resources on their behalf without requiring any additional input or intervention from the user.Regenerate response
Custom Delegation Grant
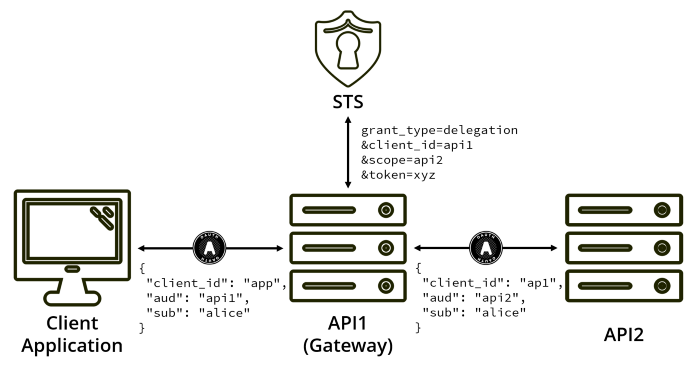
An approach is seen used by the community is to create a new grant type that can be used to exchange access tokens used to access API1 for a token to access API2, while still acting on the user’s behalf.
This keeps our tokens intended audience scoped to only what is necessary and keeps the delegating user intact.
This delegation protocol would rely on client authentication to remain secure. However, we are talking about our protected resources: secure APIs that should be able to keep a secret.
This process would also benefit from a per client configuration for allowed scopes. For instance, API1 can only ask to get tokens to access API2, not vice versa, and certainly not for API3, API4, etc.
The most common form of this implementation I’ve seen uses the OAuth token endpoint, with a request that looks like the following:
POST /token
Host: auth.example.com
Authorization: Basic YXBpMTpzb21lc2VjcmV0
Content-Type: application/x-www-form-urlencodedgrant_type=delegation
&scope=api2
&token=eyJhbGciOiJIUzI1NiIsInR5cCI6IkpXVCJ9.eyJzdWIiOiIxMjMiLCJhdWQiOiJhcGkyIiwiaWF0IjoxNTE2MjM5MDIyfQ.xdnkfqb5HmXGxI_eE6AQhbykHsLS9PVXYPWhGP8q80I
With this style, we are walking the line between delegation and impersonation. While we can get a token that includes the user and API1, API2 has no way of knowing if the difference between a token issued via user interaction and a token issued as a result of delegation.
JWT Bearer Authorization Grant (RFC 7523)
From the specification, the JWT Bearer Authorization Grant is:
[A way for] a JWT Bearer Token can be used to request an access token when a client wishes to utilize an existing trust relationship, […] without a direct user-approval step at the authorization server — https://tools.ietf.org/html/rfc7523#section-1
A similar approach is defined for using SAML assertions to get access tokens in RFC 7522.
While at first seeming similar to the custom delegation approach we just discussed, the authorization grant style is not suitable for delegation in our scenario.
This is mainly because the intended audience of the JWT bearer or SAML assertion must be the authorization server. From what I’ve seen in past implementations, this authorization grant style is most suited towards swapping tokens and assertions issued by a different authorization server/identity provider, for tokens issued by our authorization server.
My other gripe with these authorization grants is that they do not require either client authentication or even a client ID. By not requiring a client identification we’re removing much of the delegation features we introduced with our custom grant type. If no identification was provided, who are we issuing the new token to? How does this affect or authorization policies within API2?
Much like our custom delegation grant type, this style also errs more towards impersonation that delegation.
And obviously, if you are using SAML 2.0 or JWT access tokens, this authorization grant type is unavailable to you. At least not in the form of a formalized specification.
OAuth 2.0 Token Exchange
The OAuth Working Group are working on a specification to formalize the above delegation scenario, currently called OAuth 2.0 Token Exchange. This draft seems to have been floating around for a while, but based on recent activity (2018), it seems to have picked up steam again.
This specification looks to achieve the same as our custom grant; however, it also takes into account a few other delegation scenarios.
So, a typical request would look like:
POST /token
Host: auth.example.com
Authorization: Basic YXBpMTpzb21lc2VjcmV0
Content-Type: application/x-www-form-urlencodedgrant_type=urn:ietf:params:oauth:grant-type:token-exchange
&resource=https://backend.example.com/api2
&subject_token=accVkjcJyb4BWCxGsndESCJQbdFMogUC5PbRDqceLTC
&subject_token_type=urn:ietf:params:oauth:token-type:access_token
Where the subject token is the original token, delegated to API1, and token type is the type of that token (in this case an access token).
The token response is then slightly different than what we are used to:
HTTP/1.1 200 OK
Content-Type: application/json
Cache-Control: no-cache, no-store{
  "access_token": "eyJhbGciOiJIUzI1NiIsInR5cCI6IkpXVCJ9.eyJzdWIiOiIxMjMiLCJhdWQiOiJhcGkyIiwiaWF0IjoxNTE2MjM5MDIyfQ.xdnkfqb5HmXGxI_eE6AQhbykHsLS9PVXYPWhGP8q80I",
  "issued_token_type":"urn:ietf:params:oauth:token-type:access_token",
  "token_type":"Bearer", "expires_in":60
}
The issued_token_type tells API1 (now acting as a client application) that it has sent back an access token, informing it how to use the contents of the response. In this case, it’s simply to use to access a protected resource (API2) and not to read or validate.
The defined values for issued_token_type are:
urn:ietf:params:oauth:token-type:access_tokenurn:ietf:params:oauth:token-type:refresh_tokenurn:ietf:params:oauth:token-type:id_tokenurn:ietf:params:oauth:token-type:saml1urn:ietf:params:oauth:token-type:saml2urn:ietf:params:oauth:token-type:jwt(just a JWT, not an access token)
This delegation flow also comes with some defined JWT claim types, most notable of which are act and may_act.
The Actor claim type (act) allows us to express that delegation has taken place by using a JWT claim set about the current actor.
{
  "aud":"https://consumer.example.com",
  "iss":"https://issuer.example.com",
  "exp":1443904177,
  "nbf":1443904077,
  "sub":"user",
  "act": {
    "sub":"admin"
  }
}
Here the initial token was issued to user, and we’re still acting on their behalf. But, by using the act claim set, we can show that admin is the current actor. At the very least this would be valuable for audit trails.
Actor claim sets can be chained (an act claim set within an act claim set) to present a clear chain of delegation; however, it’s always the top-level user and their direct actor that should be used for authorization policies.
The May Act For claim type (may_act) allows us to explicitly state who is allowed to act on someone’s behalf. For instance, if we wanted to explicitly state that admin is authorized to act on user’s behalf:
{
  "aud":"https://consumer.example.com",
  "iss":"https://issuer.example.com",
  "exp":1443904177,
  "nbf":1443904077,
  "sub":"user",
  "may_act": {
    "sub":"admin"
  }
}
This means in our scenario, the process would now look like the following, where we are getting a new token that includes information about the act of delegation.
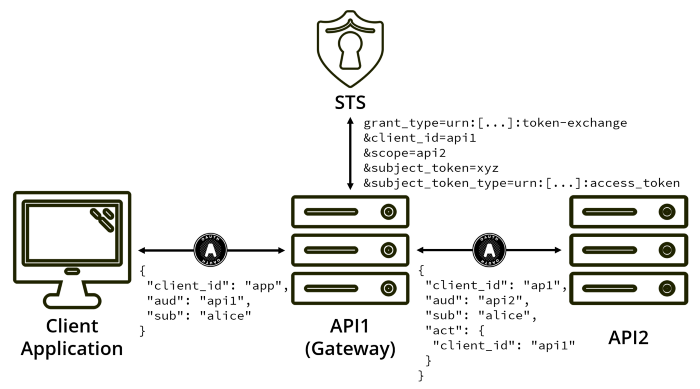
This draft makes heavy use of the resource and audience request parameters, as well as the scope parameter; however, this is a topic for another day.
What Should I Use?
For now, I would recommend sticking with the custom delegation grant style, while making sure to keep control of what each client and protected resource can access on behalf of the user.
The OAuth Working Group are working on a formalized solution which will remove the impersonation concerns, but it seems to be a moving target for now.
